Layers Panel

Summary
The Layers Dialog allows you to view and manipulate the layer hierarchy in your scene. This is where you can determine which objects get drawn first, and create Group Layer for the purpose of applying effects.
Elements of the Layers Dialog
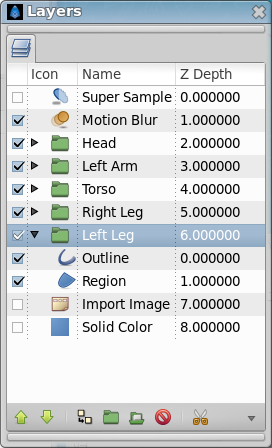
The Layers Dialog contains a detailed list of the Layer in your scene. Each row represents a layer, and the columns are:
- Show/Hide checkbox
Turns the layer on or off in the composition. This parameter is not keyable.
- Icon
The icon representing the layer type. For Region Layer, Outline Layer, and , the icons will be those of the Spline Tool, the Width Tool, and the Gradient Tool, respectively. For both Group Layer and Switch Group Layer, an expand icon (generally an arrow) precede the layer icon. This expander can be controlled with
+and-respectively to open or close the group.- Name
The name of the layer you’re currently working on.
- Z Depth
The Z Depth column indicates the Z position of the layer, which can also affect layer compositing. It does not always appear, for example, if the time of the canvas is “0”, this column will disappear.
Layer Commands
Below the layer list, are buttons (and a drop down menu containing any buttons that don’t fit on the palette). These expose the most useful layers’ commands, more commands can be found in the Canvas: Layer Menu from the Canvas: Menu Caret, or in the context menu of the Layer Panel.
Moving layers
To move multiple layers first select them by holding ctrl or
shift. Then at the last of the layers you want to move click it but
do not release the mouse button, instead release the keyboard controller
(ctrl or shift). Now you can drag the layers to where you want
them, release mouse button to drop the layers in place.