Tool Options Panel
Introduction
The Tool Options Panel displays the options you have available to
apply to the Toolbox you’re using. For the tools that
can create multiple layers at the same time the panel contextually
display the available options for the selected type of layers.
The icon for the Tool Options Panel always changes to what tool you’re currently using.
The values of the Tool Options Panel parameters are stored between
tool usages and between SynfigStudio sessions, so you can reuse them as
may times as you like.
This is the list of available options for each tool:
 Transform Tool
None
 Smooth Move Tool
Radius (real number)
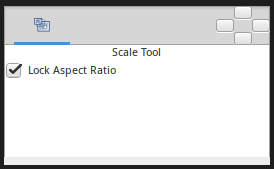
 Scale Tool
The Tool Options Panel allows you to specify:
Lock Aspect Ratio : Prevent from changing the ratio x:y of the bounding box of the selected Handles.


 Circle Tool
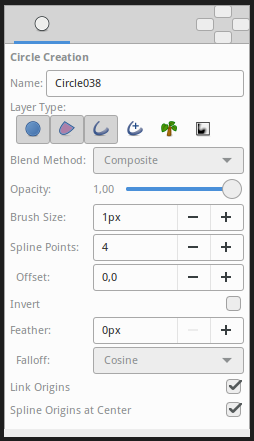
The Tool Options Panel allows you to specify:
Name : Used for the new layer; any number in this field will automatically increment with each layer created.
Layer Type : Whether create Star Layer and/or Outline Layer, Advanced Outline Layer, Region Layer, Plant Layer and Curve Gradient Layer layers (Splines).
|Blend_Method_Parameter| : The blending method used to composite on the layers below.
Opacity : Sets the Amount Parameter for new layers. Defaults to 1.00 (Completely opaque).
Brush Size : Sets the Outline width ([Outline_Layer#Outline_width]) or the size of the gradient (only for Outline Layer, Advanced Outline Layer and Curve Gradient Layer).
Spline Points : Specify the number of Spline Points that will be used in the new Splines (for other than Circle Layer).
Offset : Offset of the tangent of the Spline Points (for other than Circle Layer).
Invert : Whether invert the create(d) layer(s). Is related to his Invert.
|Feather_Parameter| : Width of the area to be dissolved at the edge (not for Plant Layer and Curve Gradient Layer).
Falloff : Determines the falloff function for the feather (only for Circle Layer).
Link Origins : Whether Link the Offset of Splines.
Spline Origins at Center : Set the origin of the layer at the center of the circle, else the center is set at the Canvas center.
 Rectangle Tool
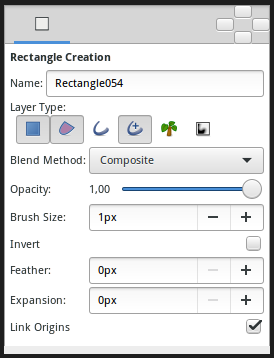
The Tool Options Panel allows you to specify:
Name : Used for the new layer name; any number in this field will automatically increment with each layer created.
Layer Type : Create Rectangle Layer and/or Region Layer, Outline Layer, Advanced Outline Layer, Plant Layer and Curve Gradient Layer (Splines).
|Blend_Method_Parameter| : How to combine the new layer with the background.
Opacity : Sets the Amount Parameter for new layers. Defaults to 1.00 (Completely opaque).
Brush Size : Sets the Outline width ([Outline_Layer#Outline_width]) or the size of the gradient (only for Outline Layer, Advanced Outline Layer and Curve Gradient Layer).
Expansion : Expand the rectangle from his corners (only for Rectangle Layer. Is related to his Expansion Amount Parameter).
|Feather_Parameter| : Width of the area to be dissolved at the edge (not for Rectangle Layer, Plant Layer and Curve Gradient Layer).
Invert : Whether invert the create(d) layer(s). Is related to his Invert.
Link Origins : Whether Link the Offset of Splines.
 Star Tool
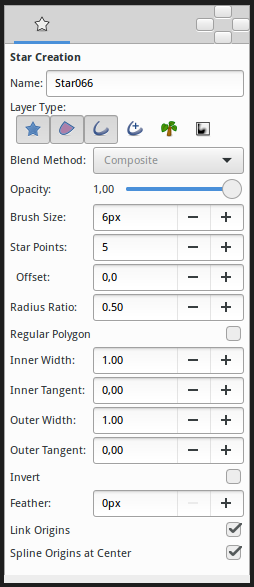
The Tool Options Panel allows you to specify:
Name : The name used for the new layer; any number in this field will automatically increment with each layer created.
Layer Type : Whether create Star Layer and/or Outline Layer, Region Layer, Plant Layer and Curve Gradient Layer layers (Splines).
|Blend_Method_Parameter| : How to combine the new layer with the background.
Opacity : Sets the Amount Parameter for new layers. Defaults to 1.00 (Completely opaque).
Brush Size : Sets the Outline width ([Outline_Layer#Outline_width]) or the size of the gradient (only for Outline Layer, Advanced Outline Layer and Curve Gradient Layer).
Star Points : The number of peaks of the star.
Offset : The rotation offset of the created star.
Radius Ratio : The ratio between the peaks and the troughs of the star.
Regular Polygon : Whether create a regular polygon instead of a star.
For Splines only, the tangent lengths for outer and inner vertices. Outer is limited to [-3,10] and inner is limited to [-3,3]. (If you find useful open those limitations please write it in the talk page).
Inner Width
Inner Tangent
Outer Width
Outer Tangent
Invert : Whether invert the create(d) layer(s).
|Feather_Parameter| : Width of the area to be dissolved at the edge (not for Plant Layer and Curve Gradient Layer).
Link Origins : Whether Link the Origin of Splines.
Spline Origins at Center : Set the Origin of the layer at the center of the star, else the center is set at the Canvas center.
 Polygon Tool
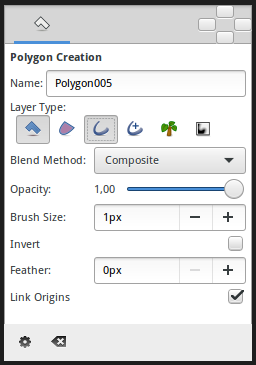
The Tool Options Panel allows you to specify:
Name : Used for the new layer; any number in this field will automatically increment with each layer created.
Layer Type : Whether create Polygon Layer and/or Outline Layer, Advanced Outline Layer, Region Layer, Plant Layer and Curve Gradient Layer layers (Splines).
|Blend_Method_Parameter| : The blending method used to composite on the layers below.
Opacity : Sets the Amount Parameter for new layers. Defaults to 1.00 (Completely opaque).
Brush Size : Sets the Outline width ([Outline_Layer#Outline_width]) or the size of the gradient (only for Outline Layer, Advanced Outline Layer and Curve Gradient Layer).
Invert : Whether invert the create(d) layer(s). Is related to his Invert.
|Feather_Parameter| : Width of the area to be dissolved at the edge (not for Plant Layer and Curve Gradient Layer).
Link Origins : Whether Link the Offset of Splines.
 Gradient Tool
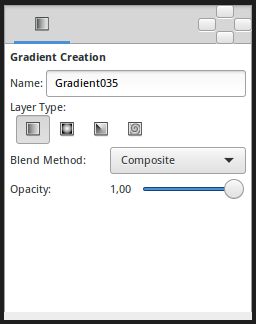
When you select the Gradient Tool, the Tool Options Panel will show the options for the Gradient Tool.
These allow you to:
Name : Set a name for the layer you are about to create. The name of the layer can always be changed later via the Layers Panel or the Parameters Panel if necessary, but the type of gradient needs to be chosen now.
Layer Type : Choose the type of gradient to create (Linear, Radial, Conical, Spiral).
|Blend_Method_Parameter| : The blending method used to composite on the layers below.
Opacity : Sets the Amount Parameter for new layers. Defaults to 1.00 (Completely opaque).
For help with editing gradient colors see the section on Gradient.
 Spline Tool
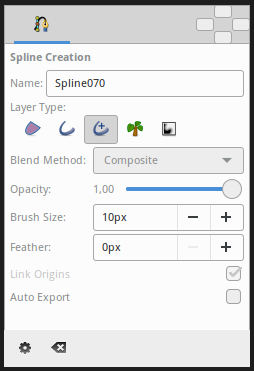
This tool has the following options:
Name: Sets the name of the Spline that you will create, in this case “Spline070”. If the ending part of the string contains an integer number, this input text box will parse it and increase that number for the next created Spline. Otherwise, it will add a three digit number while creating the next one.
Layer Type: Sets whether to create Region Layer, Outline Layer, Advanced Outline Layer, Plant Layer and/or Curve Gradient Layer Layers.
|Blend_Method_Parameter|: Sets the blending method used to composite on the layers below.
Opacity: Sets the Amount Parameter for new layers. Defaults to 1.00 (Completely opaque).
Brush Size: Sets the size of the line for Outline Layer and/or Advanced Outline Layer.
Feather: Sets the Feather Parameter of the Region Layer or Outline Layer created.
Link Origin: If checked, links the Origin for the Plant Layer, Region Layer or Outline if two of them (or all them) are checked.
Auto Export: If checked, exports automatically the Vertices Parameter (that’s a Spline type parameter).
 Draw Tool

The Tool Options Panel allows you to specify:
Name : Used for the new layer; any number in this field will automatically increment with each layer created.
Layer Type : Whether create Outline Layer and/or Advanced Outline Layer, Region Layer layers (Splines).
|Blend_Method_Parameter| : The blending method used to composite on the layers below.
Opacity : Sets the Amount Parameter for new layers. Defaults to 1.00 (Completely opaque).
Brush Size : Sets the Outline width ([Outline_Layer#Outline_width]) or the size of the gradient (only for Outline Layer, Advanced Outline Layer and Curve Gradient Layer).
Pressure Sensitive
Min Pressure : The value of this option clamps the lower end of the Pressure sensitivity to a specific value, essentially determining how thin the thinnest possible segment is relative to the Brush Size ([New Layer Defaults#Brush Size]) parameter in the Toolbox.
Smoothness : Determines how much tablet jitter is removed, and as a result, how many vertices the resulting splines are composed of. Could by Local or Global
Local : Adjust the Spline between the Splines points.
Global : Adjust the Spline globally.
Width Max Error : for advanced outline layer.
Round End : The ends of the spline will be rounded, only for Outline Layer, Advanced Outline Layer layers.
Auto Loop : When the stroke of the
Draw Toolends near the beginning of the stroke, automatically connect the last Handle to the first.Auto Extend : When the stroke begins and/or end at or near an endpoint Handle of another Outline Layer, the resulting Outline Layer is simply appended to the existing Outline Layer.
Auto Link : When the stroke begins and/or ends at or near a vertex Handle in another Outline Layer, and the outline isn’t being extended by the
Auto Extendoption above, the first and/or last vertex of the resulting Outline Layer is |Linking| to the Handle on the existing Outline Layer.Feather : Set the Feather Parameter on the layer.
Auto Export : Automatically Export the Spline list points into the Values Base Nodes of the Library Panel.
 Cutout Tool
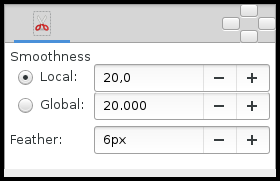
Smoothness : Adjust the Spline defining the Mask. Could be Local or Global
Local : Adjust the Spline between the Splines points.
Global : Adjust the Spline Globally.
|Feather_Parameter| : Width of the area that is going to be dissolved at the edge of the mask.
 Width Tool
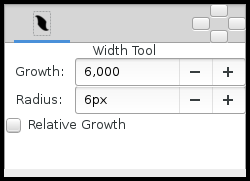
Growth - Defines how much a single mouse move will affect the line width. It must be non-zero for this tool to have an effect on the spline.
Radius - Defines the size of area around current cursor position in which a vertex will be affected. It is allows you to achieve a noticeable effect without having to follow the line precisely with the mouse. The Width Tool works fine on splines with lots of segments (such as those created with the Draw Tool), you will see it works on more than just the first vertex. It is a full circular area, other points may get in the way though.
Relative Growth - Doesn’t really work very well unless the
Radiusparameter is set to some huge value (like a million).

 Eyedrop Tool
None
 Text Tool
The Tool Options Panel allows you to specify:
the Name used for the new layer; any number in this field will automatically increment with each layer created.
Multiline Editor- whether to use a single or multi-line editor for entering the text. If a single line is used then theEnterkey will submit the value. In the multi-line editor, you’ll need to click theOKbutton with the mouse to confirm the text or hitCtrl|Tabto give focus toOKbutton.SizeX Y - the horizontal and vertical size of the text.OrientationX Y - the orientation of the text. The default (0.5, 0.5) means that the text will be centered around the point you clicked on. (0, 0) means that the top left corner of a box containing the text will be placed where you clicked. (1, 1) means that the bottom right corner of the text’s bounding box will be placed where you clicked.Family- the font family to be used.
 Sketch Tool
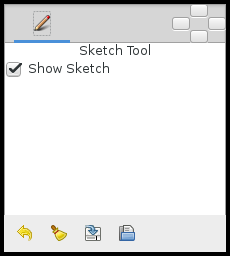
The Sketch Tool has the following in its Tool Options Panel :
Show Sketch: a checkbox for toggling the visibility of the sketch overlay On and Off.
Undo Last Stroke: cancels the most recent edit to the sketch overlay. Can be repeatedly clicked to cancel more edits.
Clear Sketch: clears the current workarea’s sketch overlay.
Save Sketch As…: writes the sketch overlay from the current workarea to a .sketch file.
Open a Sketch: loads a previously saved .sketch file, overwriting any previously drawn or opened sketch in the current workarea.
Sketch uses the color of the default foreground color in the Toolbox.
 Brush_Tool
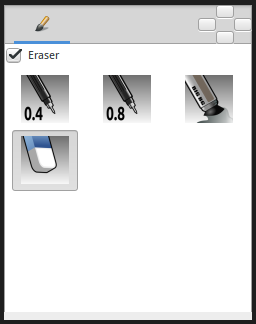
Eraser check box. When checked, the brush acts as a rubber.
Display the set of configured brushes (MyPaint brushes format). By default, Synfig is installed with a selected set of brushes from “Concept Design (C_D)” pack by Ramon Miranda.
From the Preferences Dialog System, you can configure the
Brush Presets Pathto use other brushes package (for example the ones listed by MyPaint).
The Brush Tool uses the color of the Outline Color ([New_Layer_Defaults#Brush_Colors])
and the Brush Size ([New_Layer_Defaults#Brush_Size]) set in the Toolbox to paint.