Curve Gradient Layer
About Curve Gradient Layer
As you already guessed, a Curve Gradient is a gradient that follows a curve. One side of the curve will be filled with the color at the beginning of the current gradient (see the Gradient), and the other side will be filled by the color at the end of the gradient. In other words, the gradient will fully cover your canvas (as the other gradients do), and you’ll have to play with the Blend Method if you want to bind it to a specific shape.
There are two ways to display a gradient: the default one (fast), and an
improved one that can remove any render artifacts you have with the
first one. To switch from one method to the other, check/uncheck the
Fast Parameter from the Parameters Panel.
Parameters of Curve Gradient Layer
The parameters of the Curve Gradient Layer are:
Name |
Value |
Type |
0.000000 |
real |
|
1.000000 |
real |
|
Composite |
integer |
|
0.000000pt,0.000000pt |
vector |
|
|
5.500000pt |
real |
|
List |
spline |
|
gradient |
|
|
|
bool |
|
|
bool |
|
|
bool |
|
bool |


Creating a Curve Gradient
There are several ways to create a gradient that follows a curve.
With the Spline Tool, check
Gradientin the Tool Options Panel. It will create a gradient that follows the curve you draw.In the Canvas: Menu (from the Canvas: Menu Caret or with a right click on a layer in the Layers Panel), select Gradients > Curve Gradient. It will create a gradient with a default shape. On the Parameters Panel, right click on
Vertices, and select Convert > Spline, so you can edit the shape of the gradient.To make a Curve Gradient follow an existing shape, place the
Curve Gradient Layerabove the layer containing the shape in the Layers Panel. Select those two layers, then on the Parameters Panel, right-click onVertices(greyed) and selectLink.Alternately, to make a Curve Gradient follow an existing Spline shape (Outline Layer, Region Layer, or other Curve Gradient), select the shape you want it to follow, right-click its Vertices Parameter in the Parameters Panel and chose |Export| from the menu. Type a name in the dialog that pops up. Then select the
Curve Gradient Layerwhere you want to use this exported shape. Open the Library Panel, find the shape you just exported and select it. Then right-click on the Vertices parameter of the exported Layer where you want to use the shape and selectConnectfrom the menu.
Spreading the gradient
Your Curve Gradient is now created, but it may not look at all like a
gradient. Instead it may looks like each side of the curve was filled
with a solid color. That’s because the width of the gradient is too
small. Make sure that the Curve Gradient Layer is selected, and in
the Parameters Panel, increase the Width
value. Your gradient will appear.
An easier way to increase the gradient size is to use the Width Handle. In the Canvas: Menu Caret select View > Show/Hide Handles > Show Width Handles. The Width Handles appear in purple on the Canvas. Grab one of them to adjust the width. Each Width Handle can be adjusted independently. The width of the gradient will follow the width of the Spline at each point, so it’s possible to have the gradient very wide in some places and less wide in others.
Fast Option
Within the Parameters Panel of the
Curve Gradient Layer is a Fast option. I’m unsure exactly what
speed up it produces, but it does cause a visual artifact when the
gradient is constrained with transparency as show in the Gradient page, and curve vertices are
set to width = 0.
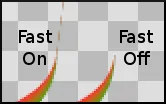
The Fast option can be turned Off in the curve gradient layer’s
Parameters Panel.