Spline Tool
![]() ALT-B
ALT-B
Introduction
Spline are the most used objects in any normal animation done with Synfig, and the Spline Tool allows you to create them.
Usage
Select the Spline Tool in the or use keyboard the shortcut Alt+b
to enable it. To leave that mode just select another from the
Toolbox.
It is easy to use this tool
Each single click creates a new
Vertex. ItsTangentvalues are set to (0,0) and theVertexbecomes a sharp corner.Click and drag creates a new
Vertexand allows the modification of theTangentvalue at thatVertex. Extending theTangentsmooths the corners.Each new
Vertexis attached to the previous by aBézier Splinedefined by the vertices’ position and tangents.The
Splineis created sequentially, oneVertexfollows the previous one.The end point of the previous
Splinearc guides the next arc created until you close it. The next createdSplinewill be independent of the previously created one.You can tweak the newly created Vertices by clicking on their Handle and dragging them.
You can also right click on a
Vertexhandle or aTangenthandle and it will provide a context menu:For
Tangenthandles:Split Tangent's AngleandSplit Tangent's Radiuswill split theTangentso that you can independently modify the arch of an end point of a Bézier curve. On the opposite,Merge Tangent's AngleandMerge Tangent's Radiuswill merge the independentTangentsso that you can align the arches of the end points of two connecting Bézier curves.For
Vertexhandles:Loop SplineorUnloop Spline(depending if already looped or not) allows you to close or open theSpline.Delete Vertexallows you to delete theVertex.
You can also right click in the middle of a Bézier curve.
Insert Vertexallows the insertion of aVertex(and sets its Tangents intelligently according to the neighboring Vertices) where you clicked.
To finish the Spline
Select another tool in the .
Or click on the gear button
 of the Tool Options Panel.
To clear out the working Spline, press the Esc button.
Category:Toolbox
Options
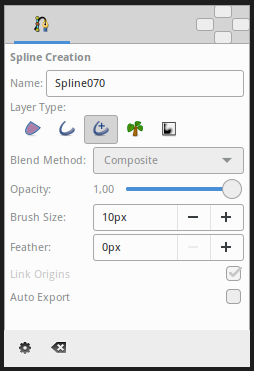
This tool has the following options:
Name: Sets the name of the Spline that you will create, in this case “Spline070”. If the ending part of the string contains an integer number, this input text box will parse it and increase that number for the next created Spline. Otherwise, it will add a three digit number while creating the next one.
Layer Type: Sets whether to create Region Layer, Outline Layer, Advanced Outline Layer, Plant Layer and/or Curve Gradient Layer Layers.
Blend Method Parameter: Sets the blending method used to composite on the layers below.
Opacity: Sets the Opcaity for new layers. Defaults to 1.00 (Completely opaque).
Brush Size: Sets the size of the line for Outline Layer and/or Advanced Outline Layer.
Feather: Sets the Feather Parameter of the Region Layer or Outline Layer created.
Link Origin: If checked, links the Origin Parameter for the Plant Layer, Region Layer or Outline if two of them (or all them) are checked.
Auto Export: If checked, exports automatically the Vertices Parameter (that’s a Spline type parameter)
Other sources of information
TODO: Add sources